Posts

Showing posts with the label mac

How to Restore Font Smoothing on MacOS Mojave for non Retina Display MacBook Pro

Image
How to Restore Font Smoothing on MacOS Mojave for non Retina Display MacBook Pro. Font Smoothing is one of the settings on a Mac computer to make the appearance of letters or text small in size, to be smoother to keep it easy to read. Mac OS In MacOS High Sierra or earlier, this setting became the standard that is commonly used when finished operating the system upgrade. But on MacOS Mojave, especially for non Retina Display MacBook Pro, Apple turns off this setting as a new standard. This was felt by MakeMac Friends, Yudha Sancaka who conveyed this to me. From Friend experience, the MD101 MacBook Pro computer that he uses instead shows a subtle font after upgrading to macOS Mojave 10.14. Even when entering the Font Smoothing settings in System Preferences - General, it seems there are no significant changes. Finally, he's and I found a Terminal command that must be done to make non Retina Display MacBook Pro computers be able to use Font Smoothing again. The foll...


Repairing a Mac Computer that is Trapped in Safe Mode

Image
Repairing a Mac Computer that is Trapped in Safe Mode. Safe Boot is a boot method to isolate the MacOS operating system from problems that might occur in the file system so that it cannot boot normally. mac safe mode But there are some cases where Mac computers continue to boot into Safe Mode, even though everything is in normal condition. The Reseapedia team will share several ways to check Mac computers that are always stuck in Safe Mode. See right away! 1. Check the Shift Button on the Keyboard How to enter Safe Mode is to press and hold the Shift key. So you will boot into Safe Mode with the same text at the top right of the screen. It could be that you accidentally always go into Safe Mode because the problem on the keyboard is that the Shift key is continuously pressed. How do you check this? Please log in to the Desktop and open the application to type, it can be Notes or TextEdit. Please press Option + K. If the Shift key is always pressed, the combination wil...

Microphone Button Functions on iOS 12 Keyboard

Image
Regarding Microphone Button Functions on iOS 12 Keyboard. As a new iPhone device user, maybe you are still confused with some standard displays, for example in the keyboard feature. iphone On the iOS 12 keyboard, you can find the microphone button on the left side of the Space button for iPhone with the Home Button or in the lower right corner for the iPhone with the Face ID. What is the use of the button? Can it be hidden? The microphone button on the iOS 12 keyboard is a Dictation or dictation feature. This feature is useful for converting voice input into text that you can send to chat applications or Notes notes for example. If you don't need the Dictation feature, you can hide the display from the keyboard on iOS 12. Here's the guide. How to Remove Microphone Icons on iOS 12 Keyboard How to Remove Microphone Icons on iOS 12 Keyboard Enter the Settings application. Access to the General - Keyboard section. Scroll to the very bottom and look for ...

8 Ways to Take a Screenshot on a Mac Computer

Image
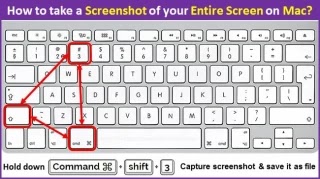
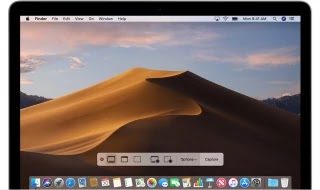
8 Ways to Take a Screenshot on a Mac Computer. Screenshot or making an image recording of activity on the screen is one of the basic features of computer usage. This feature is usually used to show a part that you want to explain to other users or maybe a display that you can't save in the normal way. In this article the Reseapedia team will explain several ways to make screenshots on a Mac computer. See right away! Screenshot on a Mac Computer 1. Take a Screenshot of the Entire Screen Surface Press Shift + Command + 3 Search for screenshots on Desktop with the name Screen Shot followed by the date and time. The format is a .png image document. 2. Take a screenshot in the Options section This feature works for those of you who want to make a screenshot of a particular part, not all the surface of the screen. Here's the guide: Press the Shift + Command + 4. The arrow icon will turn to the crosshair or + line with a circle on the inside. Press and hold...

How to Screenshot (Print Screen) on Mac OS X

Image
How to Screenshot (Print Screen) on Mac OS X. There are several ways you can do to take Screenshot or Screen Capture on Mac OsX. Mac OS X command + shift + 3, to take a screenshot of the entire screen. command + shift + 4, release, then select the area by holding left click, to take screenshots in certain areas. command + shift + 4 + space, release, then select / click Windows, to take screenshots in certain windows. By default, the screenshot results will be saved in the .PNG format and stored in the DESKTOP screen. Of course this will be a little annoying because it will make the screen a bit 'dirty' if we take a lot of screenshots. Well, it's good we save it in a certain folder on the desktop. Changing the default location of the screenshot storage folder needs to be done in several stages. 1. Create a new folder on the desktop, for example we name it ‘Screenshots‘. 2. Open the Terminal window, this app can be found in Finder> Applications...